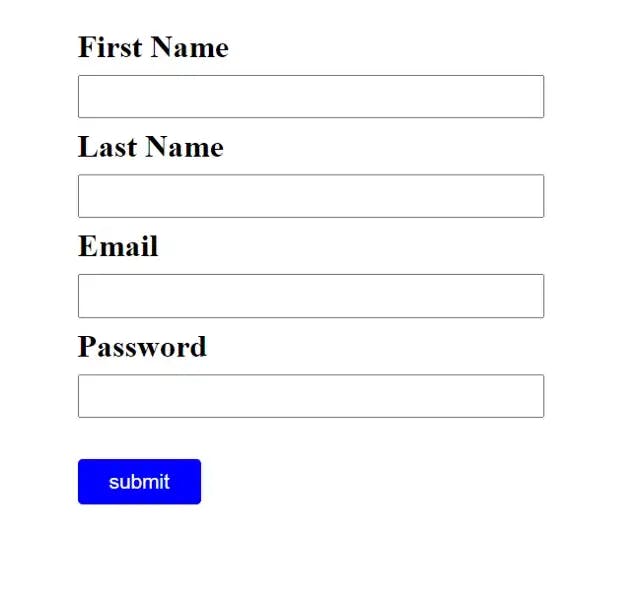
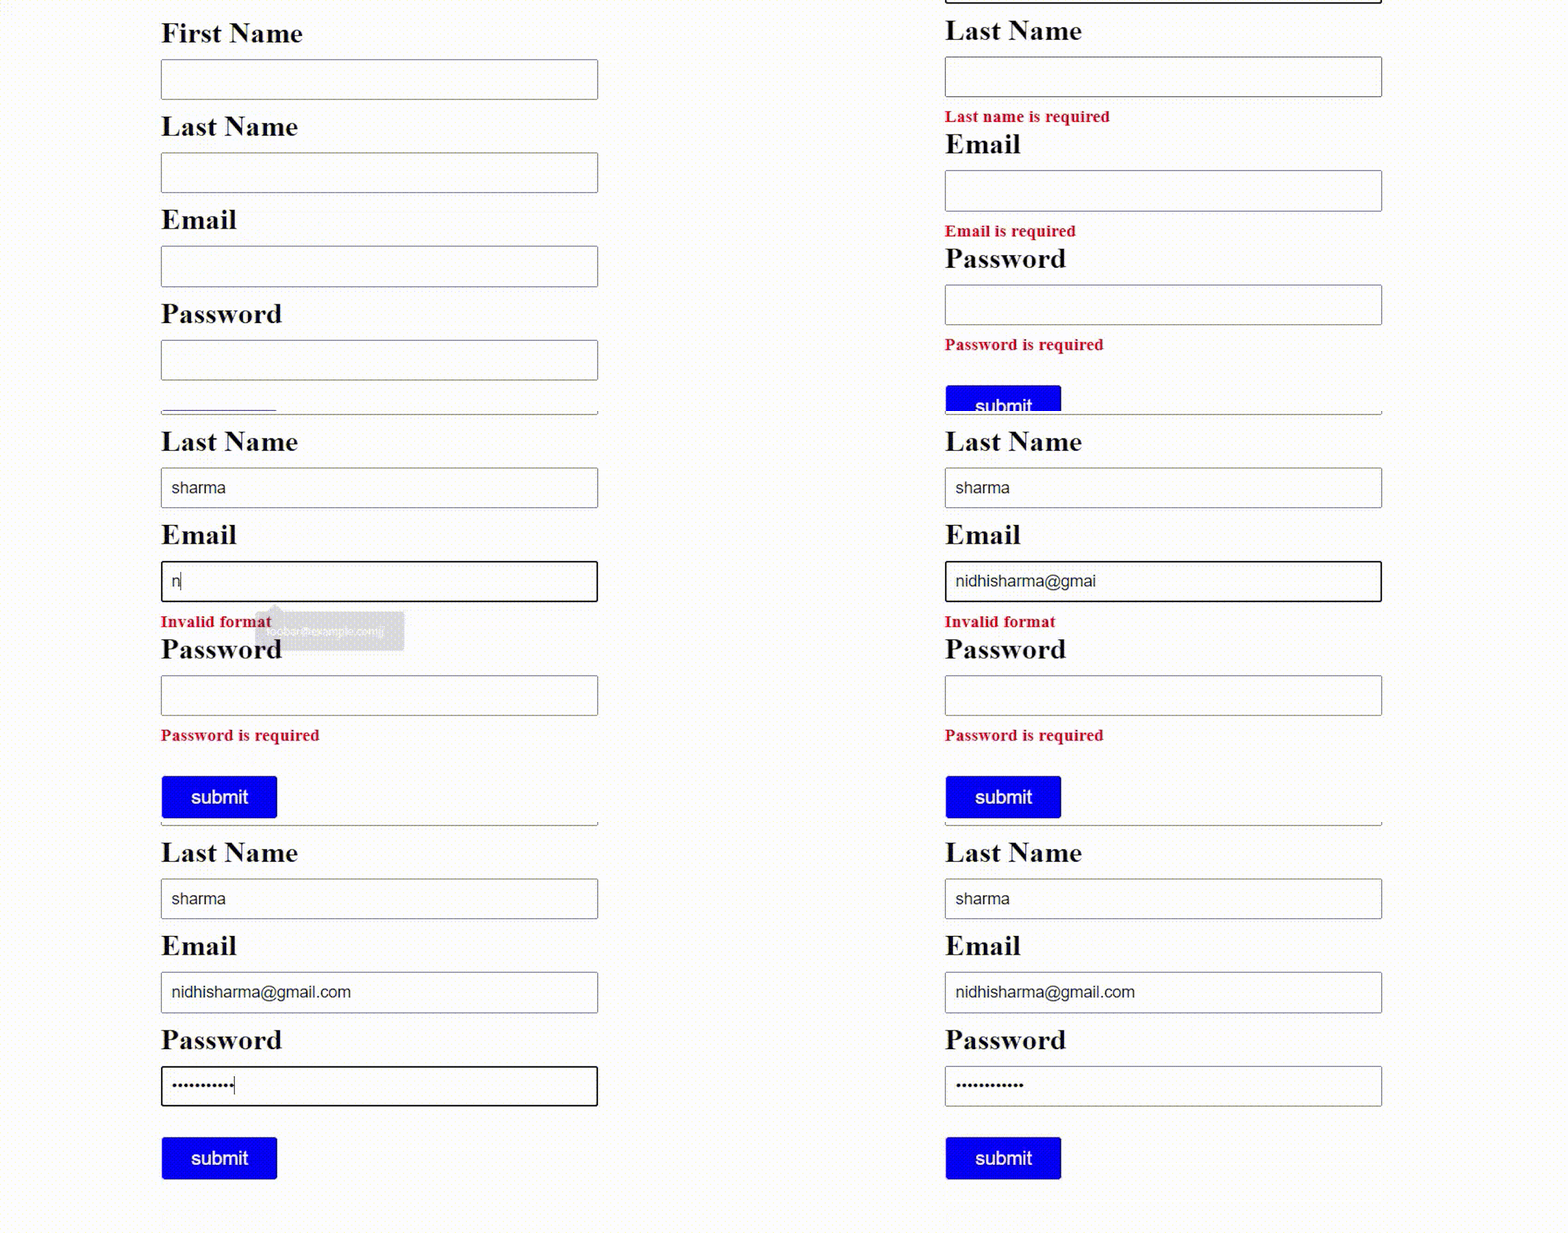
Today, we’ll learn how to create forms in React using formik and validate them using yup.
Have a look at what we are going to create today.
If I click on the submit button then the form should throw errors and the error will disappear after filling the value in the input.
let’s start with formik.
first, you have to create the react-app
npx create-react-app formik-form
then install formik and yup
npm i formik
npm i yup
Why do we require Formik…?
As we can create forms in react, it requires so much effort to manage the forms’ state, and if you are making a large form, then it will become very difficult to handle all the states mannualy in react.
What formik does…?
Getting values in and out of form state
Validation and error messages( we can validate the data and throw the errors if the entered data is not valid.)
Handling form submission (we can submit the form using formik handle submit method)
So first we look at the most elaborate way of creating forms using formik in react and validating them by using yup.
we’ll use the useFormik hook to create a form
useFormik hook helps us to manage the state, validation, and form submission.
so we are going to create a sign-up form
import React from 'react';
import { Formik, useFormik } from 'formik';
import * as Yup from 'yup'


const validateSchema = Yup.object().shape({
  firstName:Yup.string().required('Name is required').min(2,'Name should contained 2 or more characters'),
  lastName:Yup.string().required('Last name is required').min(2,'Last name should contained 2 or more characters'),
  email:Yup.string().email('Invalid format').required('Email is required'),
  password:Yup.string().required('Password is required').min(8,'Password length should be more then or equal to 8'),
});

const SignUp = () => {

  const formik = useFormik({
    initialValues:{
      firstName:'',
      lastName:'',
      email:'',
      password:'',
    },
    onSubmit:values=>{
      console.log(values)
    },
    validationSchema:validateSchema
  });

  return (
    <form onSubmit={formik.handleSubmit}>
      <label htmlFor="firstName">First Name</label>

      <input
        type="text"
        name='firstName'
        value={formik.values.firstName}
        onChange={formik.handleChange}
        onBlur={formik.handleBlur}/>

      {formik.touched.firstName && formik.errors.firstName && <div className='error'>{formik.errors.firstName}</div>}

      <label htmlFor="lastName">Last Name</label>

      <input
        type="text"
        name='lastName'
        value={formik.values.lastName}
        onChange={formik.handleChange}
        onBlur={formik.handleBlur}/>

      {formik.touched.lastName && formik.errors.lastName && <div className='error'>{formik.errors.lastName}</div>}

      <label htmlFor="email">Email</label>

      <input
        type="email"
        name='email'
        value={formik.values.email}
        onChange={formik.handleChange}
        onBlur={formik.handleBlur}/>

        {formik.touched.email && formik.errors.email && <div className='error'>{formik.errors.email}</div>}

      <label htmlFor="password">Password</label>

      <input
        type="password"
        name='password'
        value={formik.values.password}
        onChange={formik.handleChange}
        onBlur={formik.handleBlur}/>

        {formik.touched.password && formik.errors.password && <div className='error'>{formik.errors.password}</div>}

      <button type='submit'>submit</button>
    </form>
  )
}

export default SignUp
let’s break it down into some simple steps.
First, create a simple layout for the form.
import React from 'react';
import { Formik, useFormik } from 'formik';
import * as Yup from 'yup'

const SignUp = () => {

  return (
    <form>
      <label htmlFor="firstName">First Name</label>

      <input
        type="text"
        name='firstName'/>

      <label htmlFor="lastName">Last Name</label>

      <input
        type="text"
        name='lastName'/>

      <label htmlFor="email">Email</label>

      <input
        type="email"
        name='email'/>

      <label htmlFor="password">Password</label>

      <input
        type="password"
        name='password'/>

      <button type='submit'>submit</button>
    </form>
  )
}

export default SignUp
so here we have created a simple form that requires the user's first name, last name, email, and password.

Now let’s use useFormik hook to handle our form
const formik = useFormik({
    initialValues:{
      firstName:'',
      lastName:'',
      email:'',
      password:'',
    },
    onSubmit:values=>{
      console.log(values)
    },
    validationSchema:validateSchema
 });
useFormik return an object which we have stored in formik variable.
so here we have defined 3 things.
initialValues to our form state. initialValues should be given the same name as the form.
onSubmit function, which triggers when the user submits the form. Here we are simply console the values
validationSchema which is used to validate the form data.
let’s declare validations for our form using yup
const validateSchema = Yup.object().shape({
  firstName:Yup.string().required('Name is required').min(2,'Name should contained 2 or more characters'),
  lastName:Yup.string().required('Last name is required').min(2,'Last name should contained 2 or more characters'),
  email:Yup.string().email('Invalid format').required('Email is required'),
  password:Yup.string().required('Password is required').min(8,'Password length should be more then or equal to 8'),
});
Here, I have added the validation using yup.
I have added the validation for the firstName that should be a string and it’s required. A user cannot submit the form without filling in the first name and the min length is 2. That means the first name should be greater than or equal to two characters.
If the user submits the form without entering the first name it will show the error i.e. required

if the user enters a name that is not greater than or equal to two characters. then it’ll also show the error

If the user enters a name that is greater than or equal to two characters. then the error will disappear.

this same method will follow for other fields as well for validation
So far we’ve created the basic sign-up page, useFormik and validationSchema.
let’s add formik into our form

First added the handleSubmit which triggers the onSubmit to the form
After that, let’s add the properties to the input field as well.
<input
  type="text"
  name='firstName'
  value={formik.values.firstName}
  onChange={formik.handleChange}
  onBlur={formik.handleBlur}/>
here we have set the value equal to the formik.values.firstName and added the onChange handler and onBlur handler
formik.handleChange will automatically handle the form’s value
formik.handleBlur bascially help to know whether an input has been touched or not. if it is touched and it has error only show the error
let’s set the error for each field
<input
  type="text"
  name='firstName'
  value={formik.values.firstName}
  onChange={formik.handleChange}
  onBlur={formik.handleBlur}/>

{formik.touched.lastName && formik.errors.lastName && <div className='error'>{formik.errors.lastName}</div>}
here we are looking for if the user has visited the input and entered the invalid data then show the error.
So, now you have created the form using formik and yup 🎉🎉
Now let’s refactor the code.
step-1: formik provided the alternative for handleChange , handleBlur and value which is formik.getFieldProps(‘name’). it takes the name of the input.

Now, updated code should look like this
<form onSubmit={formik.handleSubmit}>
      <label htmlFor="firstName">First Name</label>

      <input
        type="text"
        name='firstName'
        {...formik.getFieldProps("firstName")}
        />

      {formik.touched.firstName && formik.errors.firstName && <div className='error'>{formik.errors.firstName}</div>}

      <label htmlFor="lastName">Last Name</label>

      <input
        type="text"
        name='lastName'
        {...formik.getFieldProps("lastName")}
        />

      {formik.touched.lastName && formik.errors.lastName && <div className='error'>{formik.errors.lastName}</div>}

      <label htmlFor="email">Email</label>

      <input
        type="email"
        name='email'
        {...formik.getFieldProps("lastName")}

        />

        {formik.touched.email && formik.errors.email && <div className='error'>{formik.errors.email}</div>}

      <label htmlFor="password">Password</label>

      <input
        type="password"
        name='password'
        {...formik.getFieldProps("password")}
        />

        {formik.touched.password && formik.errors.password && <div className='error'>{formik.errors.password}</div>}

      <button type='submit'>submit</button>
    </form>
step-2: Now, we’ll replace the useFormik hook with Formik component.
import { Formik } from ‘formik’
wrap the entire form using Formik component.
pass the different props to the Formik component.
replace form with Form component.
import React from 'react';
import { Formik, Form } from 'formik';
import * as Yup from 'yup'


const validateSchema = Yup.object().shape({
  firstName:Yup.string().required('Name is required').min(2,'Name should contained 2 or more characters'),
  lastName:Yup.string().required('Last name is required').min(2,'Last name should contained 2 or more characters'),
  email:Yup.string().email('Invalid format').required('Email is required'),
  password:Yup.string().required('Password is required').min(8,'Password length should be more then or equal to 8'),
});

const SignUp = () => {

  const initialValues = {
    firstName:'',
    lastName:'',
    email:'',
    password:'',
  }

  const handleSubmit= values=>{
    console.log(values)
  }


  return (
    <Formik
    initialValues={initialValues}
    onSubmit={handleSubmit}
    validationSchema={validateSchema}>
      <Form>
        <label htmlFor="firstName">First Name</label>

        <input
          type="text"
          name='firstName'
          {...formik.getFieldProps("firstName")}
          />

        {formik.touched.firstName && formik.errors.firstName && <div className='error'>{formik.errors.firstName}</div>}

        <label htmlFor="lastName">Last Name</label>

        <input
          type="text"
          name='lastName'
          {...formik.getFieldProps("lastName")}
        />

        {formik.touched.lastName && formik.errors.lastName && <div className='error'>{formik.errors.lastName}</div>}

        <label htmlFor="email">Email</label>

        <input
          type="email"
          name='email'
          {...formik.getFieldProps("lastName")}
        />

        {formik.touched.email && formik.errors.email && <div className='error'>{formik.errors.email}</div>}

        <label htmlFor="password">Password</label>

        <input
          type="password"
          name='password'
          {...formik.getFieldProps("password")}
        />

        {formik.touched.password && formik.errors.password && <div className='error'>{formik.errors.password}</div>}

        <button type='submit'>submit</button>
      </Form>
    </Formik>
  )
}

export default SignUp
5. replace the input by using Field component
import React from 'react';
import { Formik, Form, Field} from 'formik';
import * as Yup from 'yup'


const validateSchema = Yup.object().shape({
  firstName:Yup.string().required('Name is required').min(2,'Name should contained 2 or more characters'),
  lastName:Yup.string().required('Last name is required').min(2,'Last name should contained 2 or more characters'),
  email:Yup.string().email('Invalid format').required('Email is required'),
  password:Yup.string().required('Password is required').min(8,'Password length should be more then or equal to 8'),
});

const SignUp = () => {

  const initialValues = {
    firstName:'',
    lastName:'',
    email:'',
    password:'',
  }

  const handleSubmit= values=>{
    console.log(values)
  }


  return (
    <Formik
    initialValues={initialValues}
    onSubmit={handleSubmit}
    validationSchema={validateSchema}>
      <Form>
        <label htmlFor="firstName">First Name</label>

        <Field
          type="text"
          name='firstName'
          />

        <label htmlFor="lastName">Last Name</label>

        <Field
          type="text"
          name='lastName'
        />

        <label htmlFor="email">Email</label>

        <Field
          type="email"
          name='email'
        />

        <label htmlFor="password">Password</label>

        <Field
          type="password"
          name='password'
        />

        <button type='submit'>submit</button>
      </Form>
    </Formik>
  )
}

export default SignUp
After that add the ErrorMessage component to show the error
import React from 'react';
import { Formik, Form, Field, ErrorMessage} from 'formik';
import * as Yup from 'yup'

const validateSchema = Yup.object().shape({
  firstName:Yup.string().required('Name is required').min(2,'Name should contained 2 or more characters'),
  lastName:Yup.string().required('Last name is required').min(2,'Last name should contained 2 or more characters'),
  email:Yup.string().email('Invalid format').required('Email is required'),
  password:Yup.string().required('Password is required').min(8,'Password length should be more then or equal to 8'),
});

const SignUp = () => {

  const initialValues = {
    firstName:'',
    lastName:'',
    email:'',
    password:'',
  }

  const handleSubmit= values=>{
    console.log(values)
  }

  return (
    <Formik
    initialValues={initialValues}
    onSubmit={handleSubmit}
    validationSchema={validateSchema}>
      <Form>
        <label htmlFor="firstName">First Name</label>
        <Field
          type="text"
          name='firstName'
          />
        <ErrorMessage name='firstName'/>

        <label htmlFor="lastName">Last Name</label>
        <Field
          type="text"
          name='lastName'
        />
        <ErrorMessage name='lastName'/>

        <label htmlFor="email">Email</label>
        <Field
          type="email"
          name='email'
        />
        <ErrorMessage name='email'/>

        <label htmlFor="password">Password</label>

        <Field
          type="password"
          name='password'
        />
        <ErrorMessage name='password'/>

        <button type='submit'>submit</button>
      </Form>
    </Formik>
  )
}

export default SignUp
That’s all for code refactoring.
Now, you’ll see that your error message is no longer displayed in red color.
So, let’s display error message in red color
Create a new file, I have named it TextError.jsx.
It automatically received some props from ErrorMessage component
import React from 'react'

const TextError = ({children}) => {
  return (
    <div className='error'>{children}</div>
  )
}

export default TextError
Add the component property to all ErrorMessage components.
import React from 'react';
import { Formik, Form, Field, ErrorMessage} from 'formik';
import * as Yup from 'yup';
import TextError from './TextError';

const validateSchema = Yup.object().shape({
  firstName:Yup.string().required('Name is required').min(2,'Name should contained 2 or more characters'),
  lastName:Yup.string().required('Last name is required').min(2,'Last name should contained 2 or more characters'),
  email:Yup.string().email('Invalid format').required('Email is required'),
  password:Yup.string().required('Password is required').min(8,'Password length should be more then or equal to 8'),
});

const SignUp = () => {

  const initialValues = {
    firstName:'',
    lastName:'',
    email:'',
    password:'',
  }

  const handleSubmit= values=>{
    console.log(values)
  }

  return (
    <Formik
    initialValues={initialValues}
    onSubmit={handleSubmit}
    validationSchema={validateSchema}>
      <Form>
        <label htmlFor="firstName">First Name</label>
        <Field
          type="text"
          name='firstName'
          />
        <ErrorMessage component={TextError} name='firstName'/>

        <label htmlFor="lastName">Last Name</label>
        <Field
          type="text"
          name='lastName'
        />
        <ErrorMessage component={TextError} name='lastName'/>

        <label htmlFor="email">Email</label>
        <Field
          type="email"
          name='email'
        />
        <ErrorMessage component={TextError} name='email'/>

        <label htmlFor="password">Password</label>

        <Field
          type="password"
          name='password'
        />
        <ErrorMessage component={TextError} name='password'/>

        <button type='submit'>submit</button>
      </Form>
    </Formik>
  )
}

export default SignUp
congratulations you did it 🎉🎉🎉
Now you should have good understanding of formik
Hope you like this.
Happy coding!
want to give any suggestions:-
have a look at my portfolio
Email me at nidhisharma639593@gmail.com
